本文是讲解用虚拟机搭建ATC的教程,如果你是主机装Linux来搭建ATC,也可以往下看,因为ATC这个项目比较老,依赖的是Python2.7,如果安装不了Python2的pip,搭建工作是进行不下去的。
搭建ATC的首要条件是主机能发射热点,这个是硬性条件。笔记本电脑一般标配无线网卡,主机没有的话需要买一个USB无线网卡。
我的方案是VirtualBox + Ubuntu-20.04-Desktop + USB无线网卡,所以得把无线网卡挂载到Ubuntu上(通过VirtualBox的USB选项挂载)。
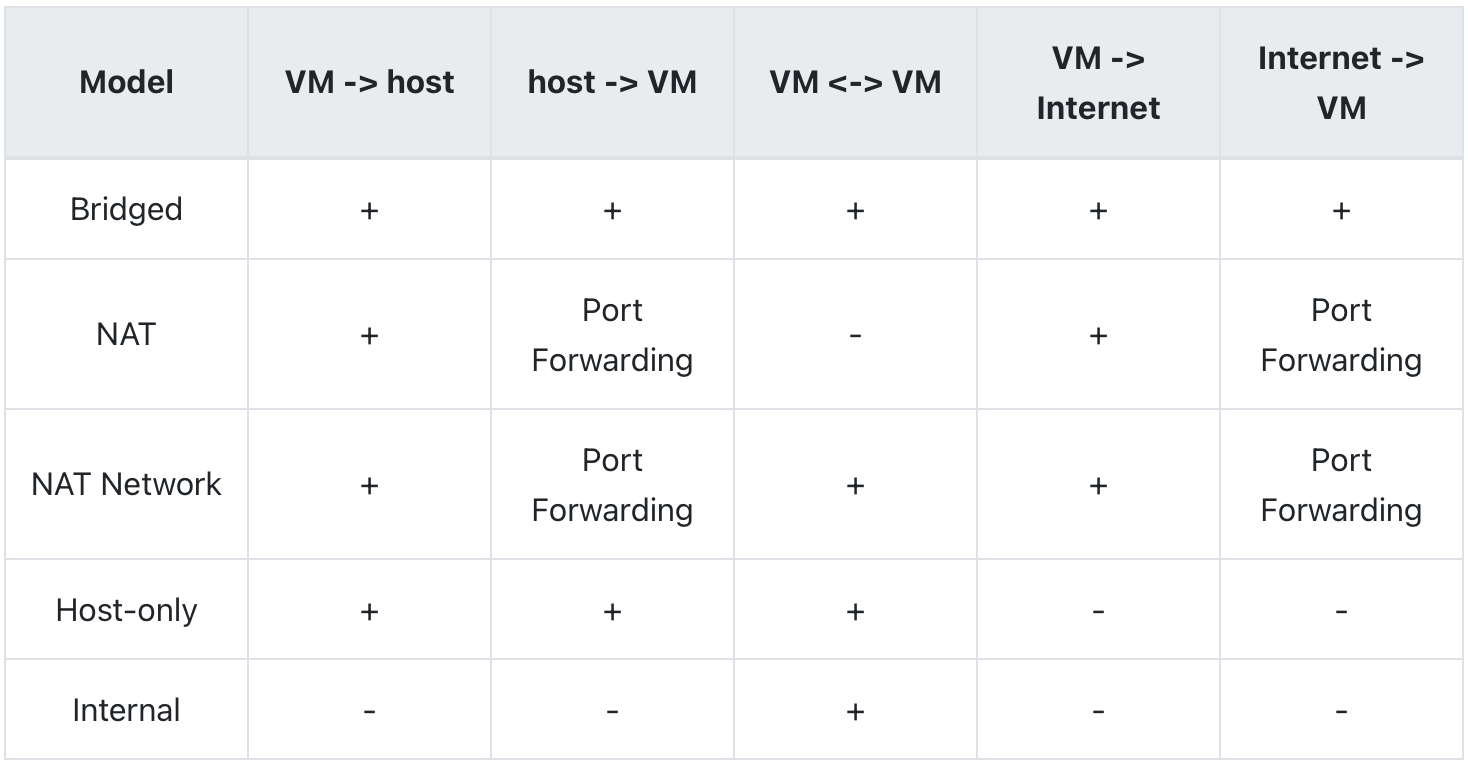
创建虚拟机时,网络连接模式一般选用NAT或桥接(我用桥接),这样手机连了热点就能访问内外网。如果不了解虚拟机网络连接模式,先看这篇教程。虚拟机网络连接模式如下:

我的无线网卡是COMFAST CF-811AC,从官网下载的驱动安装失败,后来在GitHub上发现有它的驱动源码,下载下来编译安装就可以了,重启Ubuntu生效。通过ifconfig命令,看到wlx200db04f5f01就说明无线网卡能用了。
1
2
3
4
5
6
7
8
9
10
11
12
13
14
15
16
17
18
19
20
21
22
23
24
25
26
| enp0s3: flags=4163<UP,BROADCAST,RUNNING,MULTICAST> mtu 1500
inet 192.168.0.207 netmask 255.255.252.0 broadcast 192.168.3.255
inet6 fe80::32dd:f717:7b29:cee9 prefixlen 64 scopeid 0x20<link>
ether 08:00:27:0b:7e:65 txqueuelen 1000 (Ethernet)
RX packets 442428 bytes 417116093 (417.1 MB)
RX errors 0 dropped 0 overruns 0 frame 0
TX packets 168300 bytes 21261861 (21.2 MB)
TX errors 0 dropped 0 overruns 0 carrier 0 collisions 0
lo: flags=73<UP,LOOPBACK,RUNNING> mtu 65536
inet 127.0.0.1 netmask 255.0.0.0
inet6 ::1 prefixlen 128 scopeid 0x10<host>
loop txqueuelen 1000 (Local Loopback)
RX packets 11430 bytes 948726 (948.7 KB)
RX errors 0 dropped 0 overruns 0 frame 0
TX packets 11430 bytes 948726 (948.7 KB)
TX errors 0 dropped 0 overruns 0 carrier 0 collisions 0
wlx200db04f5f01: flags=4163<UP,BROADCAST,RUNNING,MULTICAST> mtu 1500
inet 10.42.0.1 netmask 255.255.255.0 broadcast 10.42.0.255
inet6 fe80::220d:b0ff:fe4f:5f01 prefixlen 64 scopeid 0x20<link>
ether 20:0d:b0:4f:5f:01 txqueuelen 1000 (Ethernet)
RX packets 162441 bytes 25230166 (25.2 MB)
RX errors 0 dropped 40 overruns 0 frame 0
TX packets 305575 bytes 403071992 (403.0 MB)
TX errors 0 dropped 2953 overruns 0 carrier 0 collisions 0
|
接下来就是设置热点。通过nm-connection-editor命令打开网络连接管理界面,将WiFi设置为热点模式,如果不想热点的信道被干扰,可以选择5G频段,但是一些老的手机是搜不到5G频段的,这个自己权衡一下。热点发射成功后,手机连上热点,看能否使用内外网,没问题就可以往下走。
根据官方的教程,我们必须先安装好Python2-pip才能把ATC安装好。前面我也说了,ATC是爷爷辈的项目,比较老,直接sudo apt-get install python-pip是安装不了的,还好一个好心的哥哥写了教程:
1
2
3
4
5
6
7
8
9
10
11
12
13
14
15
| # 首先启用Universe存储库
sudo add-apt-repository universe
# 更新程序包索引并安装Python2
sudo apt update
sudo apt install python
# 使用curl下载get-pip.py脚本
curl https://bootstrap.pypa.io/get-pip.py --output get-pip.py
# 安装pip
sudo python get-pip.py
# 查看pip版本
pip --version
|
pip安装成功后,你离成功就不远了,激动不,下面我们继续:
1
2
3
4
5
| # 安装ATC
sudo pip install atc_thrift atcd django-atc-api django-atc-demo-ui django-atc-profile-storage
# 创建atcui
sudo django-admin startproject atcui
|
打开atcui/settings.py,添加以下配置项:
1
2
3
4
5
6
7
8
9
10
11
12
13
14
| ...
ALLOWED_HOSTS = ['*']
INSTALLED_APPS = (
...
# Django ATC API
'rest_framework',
'atc_api',
# Django ATC Demo UI
'bootstrap_themes',
'django_static_jquery',
'atc_demo_ui',
# Django ATC Profile Storage
'atc_profile_storage',
)
|
打开atcui/urls.py,添加以下配置项:
1
2
3
4
5
6
7
8
9
10
11
12
13
14
| ...
from django.views.generic.base import RedirectView
from django.conf.urls import include
urlpatterns = [
...
# Django ATC API
url(r'^api/v1/', include('atc_api.urls')),
# Django ATC Demo UI
url(r'^atc_demo_ui/', include('atc_demo_ui.urls')),
# Django ATC profile storage
url(r'^api/v1/profiles/', include('atc_profile_storage.urls')),
url(r'^$', RedirectView.as_view(url='/atc_demo_ui/', permanent=False)),
]
|
更新数据库:
1
| sudo python manage.py migrate
|
启动atcd
1
2
| # 用虚拟机搭建ATC,atcd需要指定wan和lan
sudo atcd --atcd-wan enp0s3 --atcd-lan wlx200db04f5f01
|
启动atcui
1
| python manage.py runserver 0.0.0.0:8000
|
到这里,ATC就搭建好了。可是手机连上了热点,浏览器输入0.0.0.0:8080却不能访问,别急,通过ifconfig找到无线网卡的inet,比如我的是10.42.0.1,浏览器应该输入10.42.0.1:8000就可以访问了。
如果不想自己配置网络类型,可以使用官方默认的:
- 2G - Developing Rural
- 2G - Developing Urban
- 3G - Average
- 3G - Good
- Cable
- DSL
- Edge - Average
- Edge - Good
- Edge - Lossy
- No Connectivity
配置官方默认的网络类型:
1
| utils/restore-profiles.sh 0.0.0.0:8000
|
